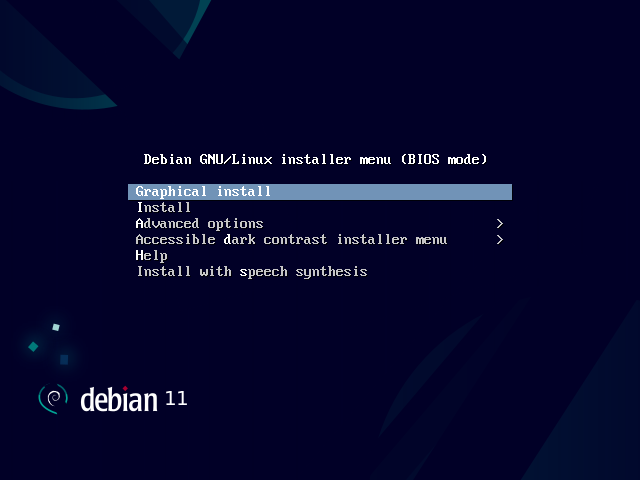
Once the BIOS has begun booting from the CD- or DVD-ROM, the Isolinux bootloader menu appears. At this stage, the Linux kernel is not yet loaded; this menu allows you to choose the kernel to boot and enter possible parameters to be transferred to it in the process.
For a standard installation, you only need to choose “Install” or “Graphical install” (with the arrow keys), then press the Enter key to initiate the remainder of the installation process. If the DVD-ROM is a “Multi-arch” disk, and the machine has an Intel or AMD 64-bit processor, those menu options enable the installation of the 64-bit variant ( amd64 ) and the installation of the 32-bit variant remains available in a dedicated sub-menu (“32-bit install options”). If you have a 32-bit processor, you don't get a choice and the menu entries install the 32-bit variant ( i386 ).
GOING FURTHER 32 or 64 bits?
The fundamental difference between 32- and 64-bit systems is the size of memory addresses. In theory, a 32-bit system cannot work with more than 4 GB of RAM (2 32 bytes). In practice, it is possible to work around this limitation by using the 686-pae kernel variant, so long as the processor handles the PAE (Physical Address Extension) functionality. Using it does have a notable influence on system performance, however. This is why it is useful to use the 64-bit mode on a server with a large amount of RAM.
For an office computer (where a few percent difference in performance is negligible), you must keep in mind that some proprietary programs are not available in 64-bit versions. It is technically possible to make them work on 64-bit systems, but you have to install the 32-bit versions of all the necessary libraries (see Section 5.4.5, “Multi-Arch Support”), and sometimes to use setarch or linux32 (in the util-linux package) to trick applications regarding the nature of the system.
IN PRACTICE Installation alongside an existing Windows system
If the computer is already running Windows, it is not necessary to delete the system in order to install Debian. You can have both systems at once, each installed on a separate disk or partition, and choose which to start when booting the computer. This configuration is often called “dual boot”, and the Debian installation system can set it up. This is done during the hard drive partitioning stage of installation and while setting up the bootloader (see the sidebars IN PRACTICE Shrinking a Windows partition and BEWARE Bootloader and dual boot).
If you already have a working Windows system, you can even avoid using a CD-ROM; Debian offers a Windows program that will download a light Debian installer and set it up on the hard disk. You then only need to reboot the computer and choose between normal Windows boot or booting the installation program. You can also find it on a dedicated website with a rather explicit title…
BACK TO BASICS Bootloader
The bootloader is a low-level program that is responsible for booting the Linux kernel just after the BIOS passes off its control. To handle this task, it must be able to locate the Linux kernel to boot on the disk. On the i386 and amd64 architectures, the two most used programs to perform this task are LILO , the older of the two, and GRUB , its modern replacement. Isolinux and Syslinux are alternatives frequently used to boot from removable media.
Each menu entry hides a specific boot command line, which can be configured as needed by pressing the TAB key before validating the entry and booting. The “Help” menu entry displays the old command line interface, where the F1 to F10 keys display different help screens detailing the various options available at the prompt. You will rarely need to use this option except in very specific cases.
The “expert” mode (accessible in the “Advanced options” menu) details all possible options in the process of installation, and allows navigation between the various steps without them happening automatically in sequence. Be careful, this very verbose mode can be confusing due to the multitude of configuration choices that it offers.
The "rescue" mode, also accessible in the “Advanced options” menu, allows to recover a broken system or fix the bootloader. After presenting the first few screens of the installer, it will allow to enter a shell prompt in the file system you selected to perform any necessary actions, or allow to re-install the bootloader.
Figure 4.1. Boot screen
Once booted, the installation program guides you step by step throughout the process. This section presents each of these steps in detail. Here we follow the process of an installation from an amd64 DVD-ROM (more specifically, the RC3 version of the installer for Bullseye ); netinst installations, as well as the final release of the installer, may look slightly different. We will also address installation in graphical mode, but the only difference from “classic” (text-mode) installation is in the visual appearance.
The installation program begins in English, but the first step allows the user to choose the language that will be used in the rest of the process. Choosing French, for example, will provide an installation entirely translated into French (and a system configured in French as a result). This choice is also used to define more relevant default choices in subsequent stages (notably the keyboard layout).
BACK TO BASICS Navigating with the keyboard
Some steps in the installation process require you to enter information. These screens have several areas that may “have focus” (text entry area, checkboxes, list of choices, OK and Cancel buttons), and the TAB key allows you to move from one to another.
In graphical mode, you can use the mouse as you would normally on an installed graphical desktop.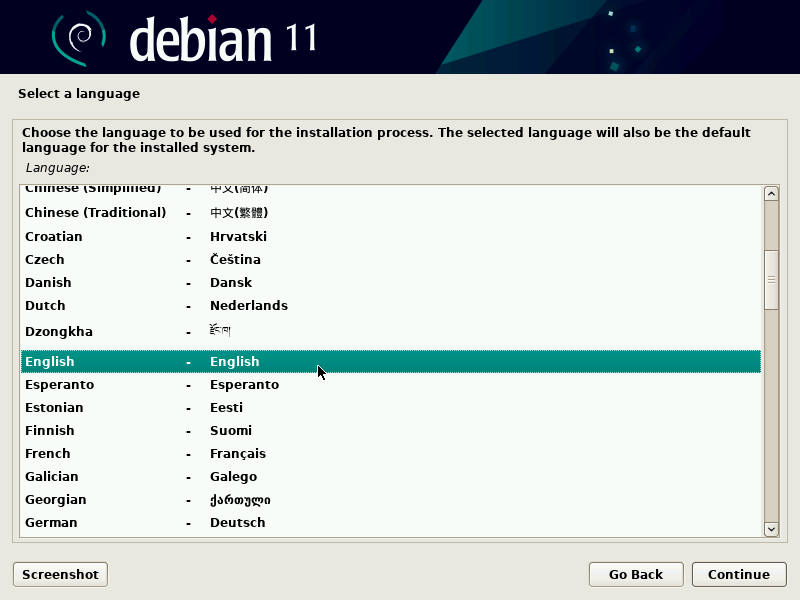
Figure 4.2. Selecting the language
The second step consists in choosing your country. Combined with the language, this information enables the program to offer the most appropriate keyboard layout. This will also influence the configuration of the time zone. In the United States, a standard QWERTY keyboard is suggested, and a choice of appropriate time zones is offered.
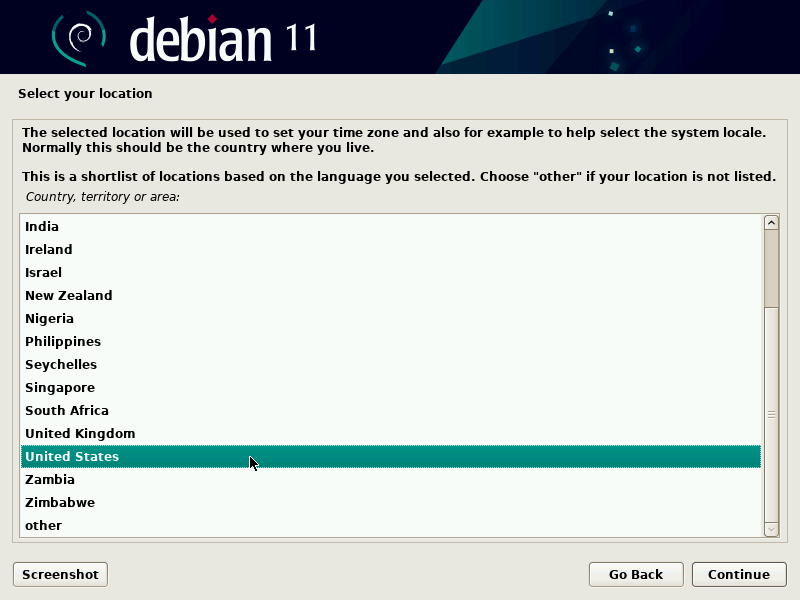
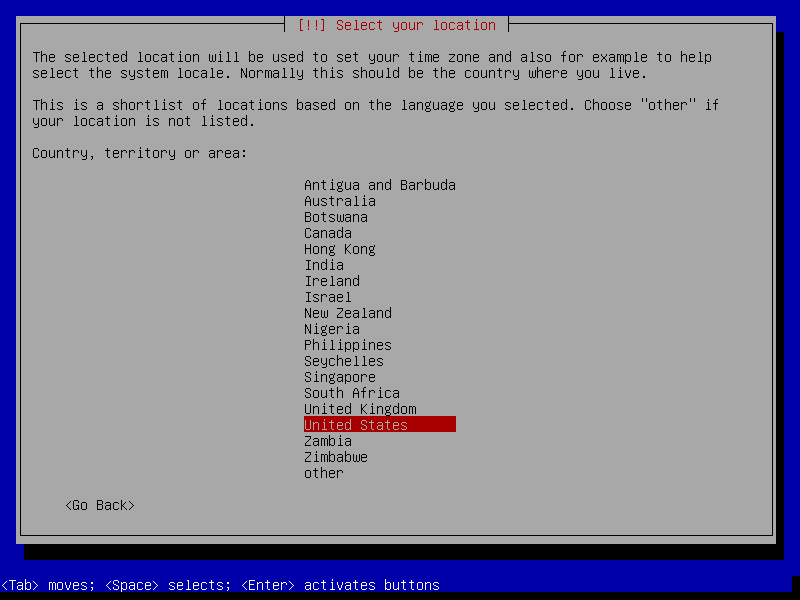
Figure 4.3. Selecting the country
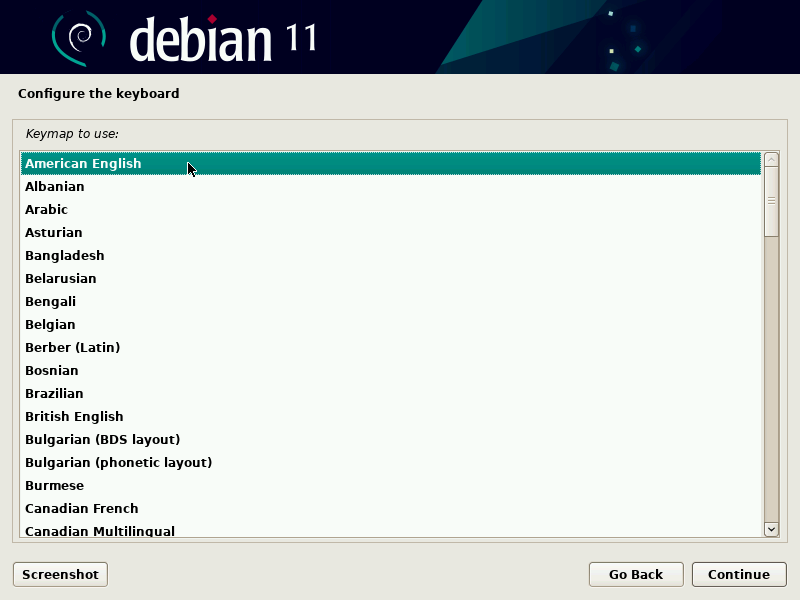
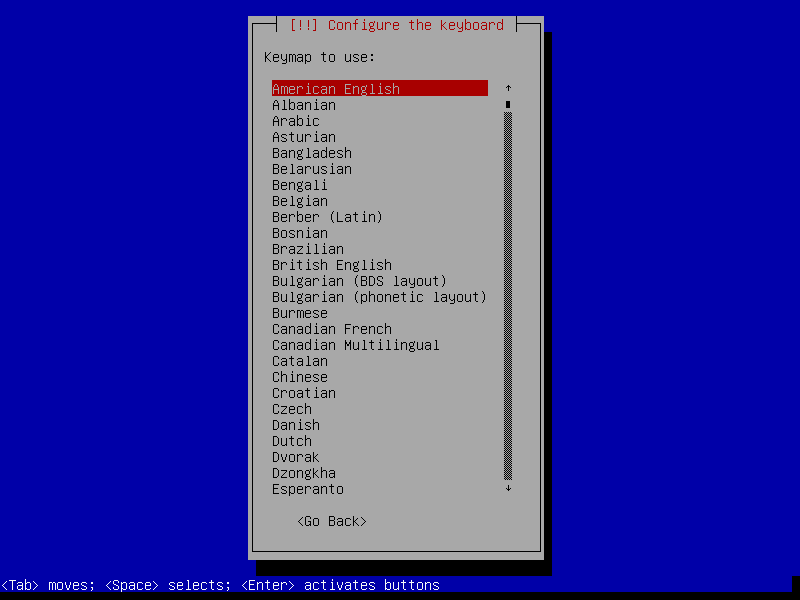
Figure 4.4. Choice of keyboard
This step is completely automatic in the vast majority of cases. The installer detects your hardware, and tries to identify the CD-ROM drive used in order to access its content. It loads the modules corresponding to the various hardware components detected, and then “mounts” the CD-ROM in order to read it. The previous steps were completely contained in the boot image included on the CD, a file of limited size and loaded into memory by the BIOS when booting from the CD.
The installer can work with the vast majority of drives, especially standard ATAPI peripherals (sometimes called IDE and EIDE). However, if detection of the CD-ROM reader fails, the installer offers the choice to load a kernel module (for instance, from a USB key) corresponding to the CD-ROM driver.
With the contents of the CD now available, the installer loads all the files necessary to continue with its work. This includes additional drivers for the remaining hardware (especially the network card), as well as all the components of the installation program.
This automatic step tries to identify the network card and load the corresponding module. If automatic detection fails, you can manually select the module to load. If no module works, it is possible to load a specific module from a removable device. This last solution is usually only needed if the appropriate driver is not included in the standard Linux kernel, but available elsewhere, such as the manufacturer's website or in firmware archives/packages.
This step must absolutely be successful for netinst installations, since the Debian packages must be loaded from the network.
In order to automate the process as much as possible, the installer attempts an automatic network configuration by DHCP (for IPv4) and by IPv6 network discovery. If this fails, it offers more choices: try again with a normal DHCP configuration, attempt DHCP configuration by declaring the name of the machine, or set up a static network configuration.
This last option requires an IP address, a subnet mask, an IP address for a potential gateway, a machine name, and a domain name.
TIP Configuration without DHCP
If the local network is equipped with a DHCP server that you do not wish to use, because you prefer to define a static IP address for the machine during installation, you can add the netcfg/use_dhcp=false option when booting from the installation media. You just need to go to the desired menu entry by pressing the TAB key and add the desired option before pressing the Enter key.
BEWARE Do not improvise
Many local area networks are based on an implicit assumption that all machines can be trusted, and inadequate configuration of a single computer will often perturb the whole network. As a result, do not connect your machine to a network without first agreeing with its administrator on the appropriate settings (for example, the IP address, netmask, and broadcast address).
The super-user root account, reserved for the machine's administrator, is automatically created during installation; this is why a password is requested. The installer also asks for a confirmation of the password to prevent any input error, which would later be difficult to amend. Note that you can leave both fields empty if you want the root account to be disabled. In that case, the login for the root user will be deactivated and the first regular user — that will be created by the installer in the next step — will have administrative rights through sudo (see Section 8.9.4, “Sharing Administrator Rights”).
SECURITY Administrator password
The root user's password should be long (12 characters or more) and impossible to guess. Indeed, any computer (and a fortiori any server) connected to the Internet is regularly targeted by automated connection attempts with the most obvious passwords. Sometimes it may even be subject to dictionary attacks, in which many combinations of words and numbers are tested as password. Avoid using the names of children or parents, dates of birth, etc.: many of your co-workers might know them, and you rarely want to give them free access to the computer in question.
These remarks are equally applicable for other user passwords, but the consequences of a compromised account are less drastic for users without administrative rights.
If inspiration is lacking, do not hesitate to use password generators, such as pwgen (in the package of the same name).
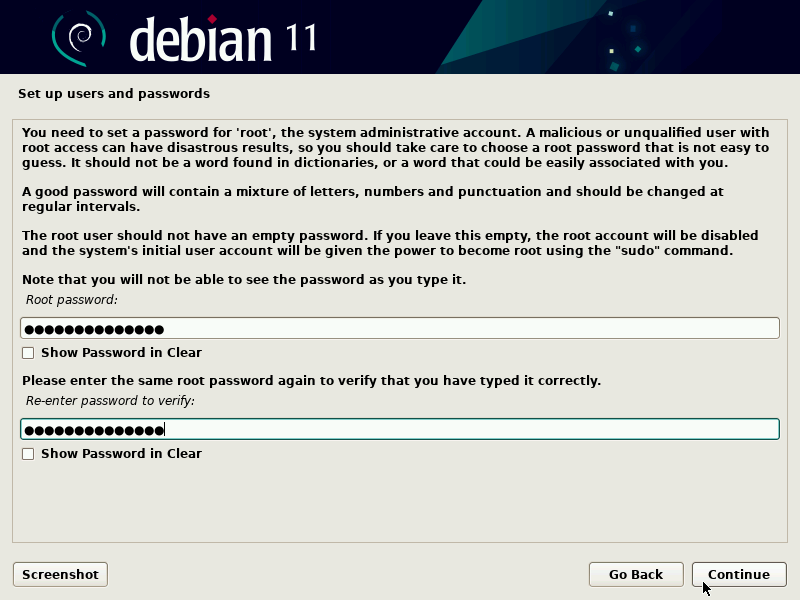
Figure 4.5. Administrator Password
Debian also imposes the creation of a standard user account so that the administrator doesn't get into the bad habit of working as root. The precautionary principle essentially means that each task is performed with the minimum required rights, in order to limit the damage caused by human error. This is why the installer will ask for the complete name of this first user, their username, and their password (twice, to prevent the risk of erroneous input).

Figure 4.6. Name of the first user
If the network is available, the system's internal clock is updated (in a one-shot way) from an NTP server. This way the timestamps on logs will be correct from the first boot. For them to remain consistently precise over time, an NTP daemon needs to be set up after initial installation (see Section 8.9.2, “Time Synchronization”).
This step automatically detects the hard drives on which Debian may be installed. They will be presented in the next step: partitioning.
CULTURE Uses of partitioning
Partitioning, an indispensable step in installation, consists in dividing the available space on the hard drives (each subdivision thereof being called a “partition”) according to the data to be stored on it and the use for which the computer is intended. This step also includes choosing the filesystems to be used. All of these decisions will have an influence on performance, data security, and the administration of the server.
The partitioning step is traditionally difficult for new users. It is necessary to define the various portions of the disks (or “partitions”) on which the Linux filesystems and virtual memory (swap) will be stored. This task is complicated if another operating system that you want to keep is already on the machine. Indeed, you will then have to make sure that you do not alter its partitions (or that you resize them without causing damage).
Fortunately, the partitioning software has a “guided” mode which recommends partitions for the user to make — in most cases, you can simply validate the software's suggestions.
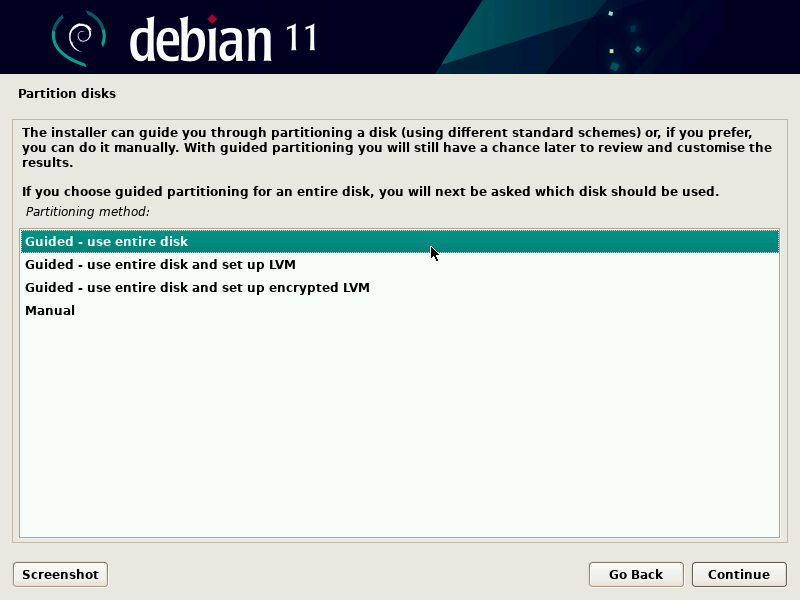
Figure 4.7. Choice of partitioning mode
The first screen in the partitioning tool offers the choice of using an entire hard drive to create various partitions. For a (new) computer which will solely use Linux, this option is clearly the simplest, and you can choose the option “Guided - use entire disk”. If the computer has two hard drives for two operating systems, setting one drive for each is also a solution that can facilitate partitioning. In both of these cases, the next screen offers to choose the disk where Linux will be installed by selecting the corresponding entry (for example, “SCSI1 (0,0,0) (sda) - 53.7 GB ATA QEMU HARDDISK”). You then start guided partitioning.
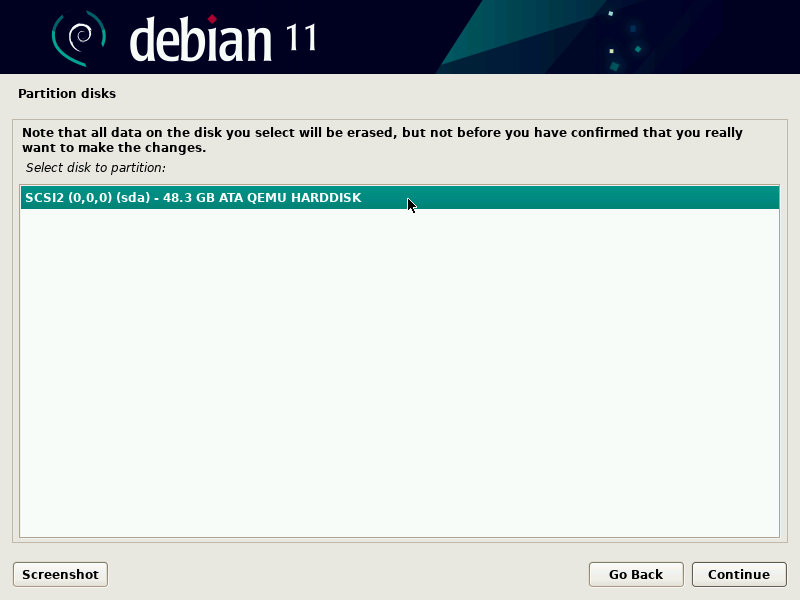
Figure 4.8. Disk to use for guided partitioning
Guided partitioning can also set up LVM logical volumes instead of partitions (see below). Since the remainder of the operation is the same, we will not go over the option “Guided - use entire disk and set up LVM” (encrypted or not).
In other cases, when Linux must work alongside other already existing partitions, you need to choose manual partitioning.
The guided partitioning tool offers three partitioning methods, which correspond to different usages.
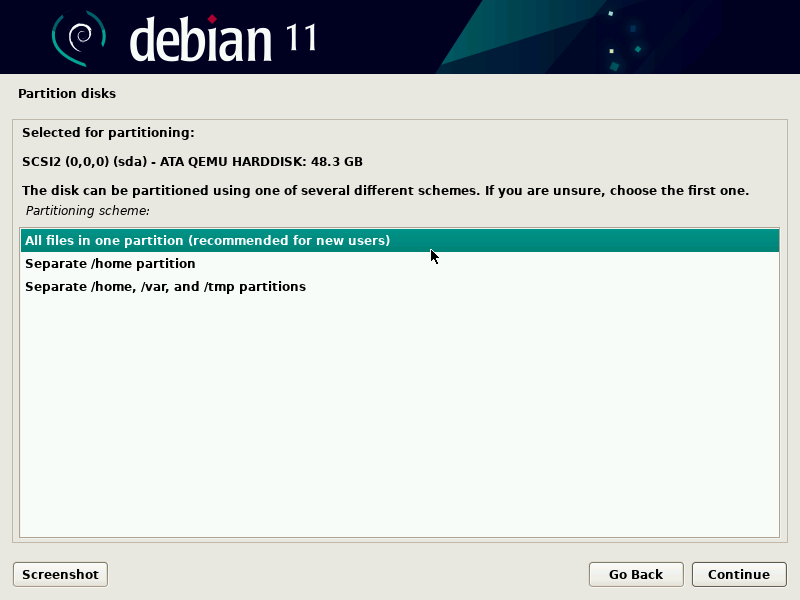
Figure 4.9. Guided partitioning
The first method is called “All files in one partition”. The entire Linux system tree is stored in a single filesystem, corresponding to the root / directory. This simple and robust partitioning fits perfectly for personal or single-user systems. In fact, two partitions will be created: the first will house the complete system, the second the virtual memory (swap).
The second method, “Separate /home partition”, is similar, but splits the file hierarchy in two: one partition contains the Linux system ( / ), and the second contains “home directories” (meaning user data, in files and subdirectories available under /home/ ).
The last partitioning method, called “Separate /home , /var , and /tmp partitions”, is appropriate for servers and multi-user systems. It divides the file tree into many partitions: in addition to the root ( / ) and user accounts ( /home/ ) partitions, it also has partitions for server software data ( /var/ ), and temporary files ( /tmp/ ). These divisions have several advantages. Users can not lock up the server by consuming all available hard drive space (they can only fill up /tmp/ and /home/ ). The daemon data (especially logs) can no longer clog up the rest of the system.
BACK TO BASICS Choosing a filesystem
A filesystem defines the way in which data is organized on the hard drive. Each existing filesystem has its merits and limitations. Some are more robust, others more effective: if you know your needs well, choosing the most appropriate filesystem is possible. Various comparisons have already been made; it seems that ReiserFS is particularly efficient for reading many small files; XFS , in turn, works faster with large files. Ext4 , the default filesystem for Debian, is a good compromise, based on the three previous versions of filesystems historically used in Linux ( ext , ext2 and ext3 ). Ext4 overcomes certain limitations of ext3 and is particularly appropriate for very large capacity hard drives. Another option would be to experiment with the very promising btrfs , which includes numerous features that require, to this day, the use of LVM and/or RAID.
A journalized filesystem (such as ext3 , ext4 , btrfs , reiserfs , or xfs ) takes special measures to make it possible to return to a prior consistent state after an abrupt interruption without completely analyzing the entire disk (as was the case with the ext2 system). This functionality is carried out by filling in a journal that describes the operations to conduct prior to actually executing them. If an operation is interrupted, it will be possible to “replay” it from the journal. Conversely, if an interruption occurs during an update of the journal, the last requested change is simply ignored; the data being written could be lost, but since the data on the disk has not changed, they have remained coherent. This is nothing more nor less than a transactional mechanism applied to the filesystem.
After choosing the type of partition, the software calculates a suggestion, and describes it on the screen; the user can then modify it if needed. You can, in particular, choose another filesystem if the standard choice ( ext4 ) isn't appropriate. In most cases, however, the proposed partitioning is reasonable and it can be accepted by selecting the “Finish partitioning and write changes to disk” entry.
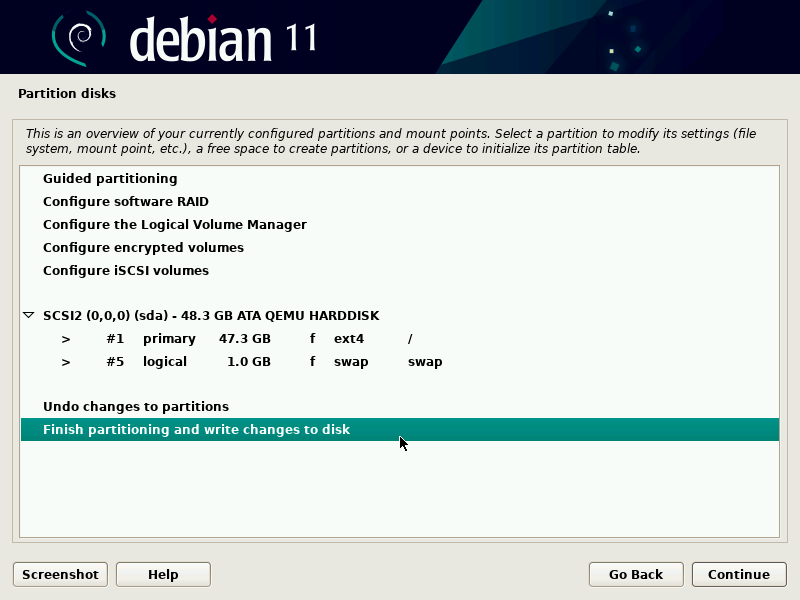
Figure 4.10. Validating partitioning